- Disconnect the water supply and discharge pipes at the heat pump, allowing any water present to drain from the heater water connections.
- With the heater isolated from the supply and return lines of the pool, place a garden hose into the Water Inlet of the heater; wrap and hold a clean rag around the garden hosesealing the hose to the inletand turn on the garden hose water supply. Allow water to push through the heater for 2-3 minutes; fresh water should be seen exiting the Water Out port. After flushing is complete, shut off the water supply and remove the water hose.
- Using compressed air at approximately 50psi, and installing the airline into the Water Inlet port of the heater (sealed with a clean rag), allow compressed air to be forced through the heater, pushing all water from the heater water circuit. The residual water should be forced out of the Water Out connection. Allow the compressed air to blow into the heater inlet for at least 15 to 20 seconds after water stops coming out of the water outlet.
- If installation is equipped with screwed unions, reconnect heater water in and out connections a few threads. The will permit any condensation formed to drain, but will restrict the entry of vermin and large insects. If screwed unions are not present, cover the ends of plumbing with plastic wrap; hold in place with tie wraps or other suitable means.
- During heater lay up, to prevent leaves, snow and other debris from falling into the heater through the fan grill, a cover is suggested. This cover should be allowed to completely envelop the fan grill, and fan cabinet top. Closing in the sides of the heater is not recommended; doing so would produce an attractive environment for vermin to nest. Heaters equipped with a hinged Cool Cap do not require additional covering.It is now safe for the heater to be stored in extended freezing conditions until placed back in service next season.
 IMPORTANT!
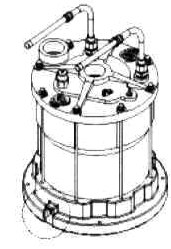
If your heater is equipped with a heat exchanger that looks like this, do NOT use these instructions to winterize. Use, instead, instructions to winterize a titanium heat exchanger.